Condensation on the piping is a frequent occurrence. This does not make the bathroom more attractive, but rather, on the contrary, becomes a problem. Wet pipes fail much faster, humidity also rises and mold begins to form. The issue must be resolved as quickly as possible. What to do if the cold water pipes start to fog up and condensation begins to form? First of all, do not panic, any malfunctions in the operation of your bathroom must be eliminated. You just need to familiarize yourself with the ways to deal with unwanted moisture and get down to business.
Causes of condensation
Residents of apartment buildings often encounter such a phenomenon as a "sweating pipe" with cold water. The reasons for the occurrence can be different. The nature of the appearance of water drops on pipes in the bathroom and in the toilet is slightly different. In the combined bathroom, the main reasons are:

Often the cause of condensation in the bathroom is poor ventilation.
- insufficient;
- continuous dialing;
- malfunction (leaks a valve that blocks cold water);
- large difference in temperature between water and ambient air in the room;
- high humidity or leakage from neighbors upstairs.
The bathroom should be well ventilated, air circulation allows you to remove unwanted moisture. During continuous operation of the tank filling system, moisture condenses not only on the riser, but also on the wiring. A dripping mixer all the time causes a similar problem.

A broken faucet can also cause high humidity in the bathroom.
Each of the reasons can independently cause "fogging" of the riser or pipes for the distribution of cold water, but, as a rule, the cause is precisely a combination of several points.
Advice! If the humidification of the pipes began suddenly, remember what changes you have made in your apartment recently. The reason may be the change of windows, and the installation of any other equipment that increases the temperature of the room.
What is the threat of a "sweating" pipe
Condensation on pipes is not just water droplets. First of all, it is an aggressive environment for. In conditions of high humidity, the material corrodes and quickly breaks down.
Under conditions of continuous humidification, a damp smell appears in the room. In addition, in places of high humidity, wonderful conditions are created for the development of various bacteria, including mold and all kinds of fungi. Constant human contact with this kind of "neighbors" is extremely undesirable and can cause malfunctions in the body.

For metal pipes, constant moisture is fraught with rust.
If the appearance of condensation or its abundance is not detected in time, puddles may form on the floor. If they are not eliminated in time, then the time for the repair work to replace the floor covering in the bathroom can be brought closer.
What to do if pipe fogging is detected
If you notice in the bathroom that the riser or other pipes related to the cold water supply are covered with small drops of water, then a series of actions should be taken to find out the cause. Our algorithm will help you:

Important! If all faults in the water supply system have been eliminated, ventilation is working correctly, then the appearance of moisture is due to the temperature difference.
The installation of new windows or additional heating systems will definitely affect the room temperature. If the temperature difference between the water in the pipe and the air in the room is more than 17 ° C, then condensation will certainly appear.
We get rid of the problem with the help of special devices
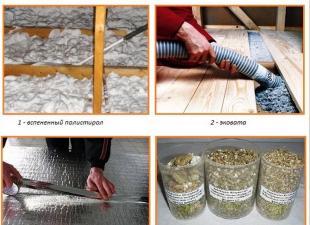
If the reason for the "sweating" pipes was determined by the temperature difference, then the first necessity will be the insulation of the cold water riser. A variety of materials can serve as insulation, they all differ from each other in price, appearance and degree of insulation.
The easiest option is purchase of foamed heat-insulating material overlays... They look like soft pipes with a cut along the length. The insulation is put on the pipe like a cover and glued. It is very important not to be mistaken with the size. If you purchase an overlay with a larger diameter, then there will be no effect, as well as with a smaller size (you cannot glue this one).

Insulation pad for cold water pipes
A more expensive but very effective way is to apply thermal insulation paint. To insulate the cold water riser, it is necessary to apply 4-6 layers of the substance, allowing each layer to dry completely. When working with paint, it is important to provide forced ventilation of the room. To do this, you can use a conventional fan.

Heat insulating paint
For greater effect, you can combine the two previous methods. Make sure that the coating is completely dry before putting the insulation cover on the painted pipe. It is also allowed to apply a layer of paint on top of the heat-insulating nozzle, but only after it is well fixed.
Another means for insulation is a larger plastic pipe, put on the main one. The resulting air space is filled with polyurethane foam.
Important! When carrying out any work on the insulation of the pipe, it is necessary to completely dry it in advance from the formed drops.
Each of these methods is very effective, but if you have not counted on your funds to purchase expensive coatings, you better use the old proven method - create thermal insulation yourself.
DIY thermal insulation
It is not so difficult to make insulation for the cold water riser yourself. For this we need:
- sandpaper;
- rust converter (eg phosphoric acid);

Rust remover
- strong thread;
- cotton fabric (old things can be used);
- epoxy putty;
- putty knife.
An old sheet or duvet cover works well as insulation. A variety of bandages and other materials can be used. Large and wide canvases are best cut into strips up to 10 cm wide and rolled into rolls.

Epoxy putty
Next, you need to clean the pipe itself and degrease the surface. A regular acetone-based nail polish remover can do this. The next step is to treat the riser with a rust conversion agent.
After careful preparation, insulation can begin. Apply a layer of putty and, without waiting for it to dry, tightly wrap the pipe with a cloth from bottom to top. Wrap the fabric so that each turn overlaps the previous one and is saturated with putty. At the end, secure the bandage tightly with thread.

Noticing that condensation often appears on the pipes in the bathroom, do not delay solving this problem.
After drying, apply several more layers of insulation. The final step will be to coat the pipe with putty. When the homemade casing is completely dry and solid, it can be sanded and painted to match the wall.
Do not ignore the problem of high humidity. Not only the appearance of your bathroom depends on this, but also the integrity of the cold water supply pipes.
How to get rid of condensation in the bathroom: video
Condensation on pipes: photo