3726 1 0
Spot ceiling lights: one universal mounting scheme for 3 types of products
22 October, 2016
Specialization: a professional in the field of construction and repair (a full cycle of finishing works, both internal and external, from sewerage to electrics and finishing works), installation of window structures. Hobby: see the column "SPECIALIZATION AND SKILLS"

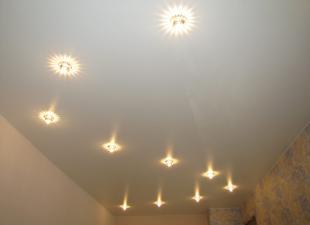
Spot lighting on ceilings is a decent, fully functional and at the same time quite aesthetic alternative to the use of traditional ceiling lamps and pendant chandeliers. The use of spot-type luminaires allows you to evenly distribute the luminous flux, minimizing the amount of glare and shaded areas.
Moreover, the lamps themselves used to organize such lighting have a number of advantages. That is why, when planning a repair, it is worthwhile to familiarize yourself with the variety of models on the market, as well as to study the method of installing spotlights for the ceiling using practical examples.
Pros of spotlights
Choosing lighting for the house as a whole and for its individual rooms, we increasingly pay attention to the dot pattern: instead of one large lamp with many bulbs, several small ones are installed on the ceiling - not so powerful, but providing a more even distribution of the light flux. This solution has several obvious advantages:
- The system turns out to be much more flexible in terms of energy consumption: if necessary, it can be designed and mounted in such a way that we can turn on and off each lamp or group of lamps separately.
- The zoning of the room is carried out according to the same principle: by including the lamps in one or another part of the room, we can create the effect we need.
- The compact size of the devices makes the entire system neat enough. At the same time, an extensive range of products allows you to choose them for almost any interior solution.

- Finally, installation is also a plus: yes, the installation of products will be more troublesome than connecting one central chandelier, but then we will not have to figure out how to securely fix a rather heavy structure to the ceiling. And if our ceiling is sheathed with plasterboard or tightened with a polymer canvas, then this advantage becomes even more obvious.
It could be argued that the price of such a solution would be lower than in the case of installing a ceiling chandelier, but this is not entirely true. The budget depends on a number of parameters, these are:
- and the number of lighting points;
- and used device models;
- and the planned capacity.
Therefore, sometimes a point scheme can be more expensive than installing one lamp, but at the same time it is guaranteed to be much more efficient.
Product selection
Type 1.With incandescent lamps
A variety of lighting devices are used to implement a point scheme. They can be classified according to a variety of characteristics, the most obvious being the type of lamps used for lighting.
Until recently, the most common devices were those using ordinary incandescent lamps as a light source:

- The obvious advantages of such models are the low price, wide assortment and ease of installation.
- In addition, I would attribute a warm glow spectrum to the merits.
- The disadvantages include high energy consumption and significant heat release. So, when installing incandescent lamps in a stretch ceiling, there is a non-zero risk of deformation or melting of the canvas.
For these purposes, I would advise using only lamps with a mirror-like inner coating. Products with a transparent base will definitely not work here, since a significant part of the energy will remain behind the skin, heating it.
However, despite these disadvantages, the installation of lamps equipped with incandescent lamps is quite justified. In any case, such devices shine quite regularly in a wooden ceiling or in a plasterboard paneling.
Type 2.With halogen lamps
An alternative to incandescent bulbs are halogen bulbs:
- The energy efficiency of halogen bulbs is much higher than that of conventional bulbs, so their installation will help reduce energy costs.
- The luminaires themselves, designed for the installation of such bulbs, usually have more compact dimensions: 60 - 70 mm in height versus 100-120.

- From my point of view, only the spectrum can be attributed to the minuses: even the models of "warm light" differ in shade from the incandescent lamps we are used to, and at first this can cause some discomfort.
Type 3. LED
If you want to minimize energy costs while providing the most efficient lighting, then your choice is LED spotlights. They are characterized by the following features:

- Minimum power consumption. LED bulbs are about 8-10 times more economical than incandescent bulbs.
- Bright enough light. Here, however, there may be problems with the spectrum, but they are solved by installing corrective light filters.
A special dimmer can be installed for LED lamps. Then we will be able to adjust their brightness depending on the situation.
- Big variety. Today, the range of LED equipment includes hundreds of models, so choosing a product that is suitable both in terms of functional parameters and design is usually not difficult.
There is one more thing that makes LED technology so attractive. If you want to reduce energy costs, then it is not at all necessary to change the lamps themselves, but you can get by with replacing incandescent lamps with LED counterparts. The main thing is that the diameter of the base coincides: LED bulbs are produced in the same way as standard ones - with E14 (thin) and E27 (thick) socles.

Other aspects of choice
When choosing spotlights for installation in a plastic ceiling, in a suspended structure made of plasterboard, etc., you should pay attention to other parameters:
- The location of the case. The most popular are, of course, built-in models. They are almost completely hidden behind the ceiling cladding, so that only the rim in the form of a decorative ring and a protective glass or the front of the lamp remain on the surface.

- However, when installing on a capital floor, there is no possibility of installing a hidden model. Alternatively, I could recommend a spot-type surface-mounted luminaire. Here, it is probably best to stop at almost flat LED models, since products with incandescent lamps are quite large in size.
In any case, to connect such lamps, you need to do hidden wiring, so that in the capital overlap you will have to make grooves, followed by their embedding with plaster.

- The next nuance is the direction of the reflector. Here you can choose between fixed and rotary models. From my point of view, fixed ones are somewhat better: they are clearly more reliable (there are no moving parts - nothing to fail), in addition, almost no one ever uses the functionality of a swivel lamp. However, if you know for sure that the function of adjusting the direction of the light flux will be in demand - feel free to take a product with a movable reflector.
- Finally, you need to think about design as well. The choice here is not very large, but at the same time, finding a model with a suitable shape, texture and color of the outer ring will not be difficult. On sale there are both standard products with polished metal decor and original semi-antique lamps.

Installation technology
Payment
Before proceeding with the installation of lamps, we need to understand how many are needed to effectively illuminate the room and how to arrange the lamps in the best way.
When calculating the number of light sources, you should focus on the minimum power, which, in turn, depends on the type of device and on the room in which it will be used.

As an example of the calculation, you can use the situation that I myself encountered:
- It was necessary to re-equip an area of 9 m2.
- For the installation, 12 W LED recessed luminaires were chosen.
- The total power consumption of the room was 9 x 4 = 36 W.
- Therefore, for effective lighting, it was necessary to install at least 3 lamps.
As a rule, if spotlights are mounted, the light should be made with a small power reserve. But in my case, a local illumination was made above the tabletop, so I stopped at three lamps, and I do not regret it.
Another important point is the distance between the spotlights on the ceiling. Here it is worth trying to place the lamps so that their light cones overlap each other, leaving no shaded areas.
There is no uniform requirement here, but for ceilings with a height of 2.5 - 2.7 m (standard for typical apartments), the optimal step is 1 - 1.2 m.In this case, the optimal distance from the nearest wall should be no more than 0.6 - 0, 7 m.

Actually, it is for this reason that sometimes you have to take more lamps than is needed according to calculations - for example, to illuminate a long corridor or a large living room.
Wiring
The installation instructions for point lights begin with a description of the reins' laying. This task is not too difficult, but troublesome - you need to run its own supply wire under each lamp. I proceed like this:

- At the stage of installation of a suspended or stretch ceiling, I make markings, marking the approximate installation points for each lamp.
- On the overlap, I mark the route of the wire.
- I am assembling the ceiling frame.
- Wire type PVA 2 × 0.75 (such reliability is enough with a large margin, especially when using LEDs) I lay in such a way that a loop about 20 cm long is formed opposite each lamp.

- If zoned lighting is planned, then a separate wire must be connected to each branch - then we can control the lamps using separate switch keys.
- When using LEDs under the ceiling, I fix the power supply.
- I fix the wires laid along the points of location of the fixtures to the frame of the suspended ceiling with plastic ties.
- For more effective protection of conductors, they can be laid in cable channels: this way we minimize the likelihood of mechanical damage or moisture leakage.

- If the lighting is mounted under a stretch ceiling, then it is better to fix the wires on the ceiling with the help. As in the case of fastening to the frame, do not tighten the mounting clamps tightly: this will prevent damage to the insulation during thermal deformation of the conductor.
Ceiling holes
After we have sheathed the ceiling (with our own hands or by the forces of a hired team), you can proceed to the next stage:

- On the lining of the ceiling, we put notes opposite the places where the lamps are installed.
- We install a crown on the drill, the diameter of which corresponds to the diameter of the selected model of the ceiling lamp (as a rule, it is 4-5 mm less than the diameter of the faceplate and 5-10 mm more than the width of the inner part).
- According to the marking, we drill holes in the places we need.
- Next, using a wire with a bent end, remove the loop of the wire and lead it out. We cut the wire, and clean its ends from insulation.
This scheme is used when installing on plasterboard, wood or PVC ceiling sheathing. But figuring out how to make a hole in a stretch ceiling is somewhat more difficult:

- To begin with, we note that before installing the canvas on the installation site of the lamps, you need to fix special racks.
- In the holes of the racks, we bring out the loops of the wires fixed on the ceiling.
- We glue special thermal insulation rings on the stretched ceiling.
- After the ring is securely glued, carefully cut out the material inside, gaining access to the wiring.

Wire connection and fixing
Connecting a spot downlight and installing it is probably the easiest step in our work:
- If this is provided by the design, then we fix the lamp holder in its body.
- We install a terminal block on the wires coming out of the cartridge.
- We also connect the wires coming out of the ceiling to the terminal block, observing the markings: L - phase, N - zero, PE - ground.

Important! Before connecting, be sure to check the absence of voltage on this branch of the network. I, being somewhat paranoid, prefer to work with a conductor that is physically disconnected from the switchboard - but for less suspicious craftsmen, it's enough to just flip the RCD switch.
- The antennae of the fastening, fixed on the body, are brought together.

- Without letting go of the antennae, we wind the lamp into the hole in the ceiling, after which the mount opens, fixing the device.
- We screw the lamp into the socket, and then, if it is provided for by the design, we mount the decorative overlay. We supply power and check how the system is functioning.
Conclusion
And ordinary, and halogen, and diode lamps for the ceiling can be installed independently - if only the master had straight arms and a bright head. And if practice will help you cope with the first, then for additional information that allows you to avoid mistakes, you should at least study the video in this article. .
In addition, my colleagues and I are always ready to help you with advice - so get advice in the comments and on the forum!
October 22, 2016If you want to express gratitude, add clarification or objection, ask the author something - add a comment or say thank you!