The use of infrared radiation for heating is beneficial from any point of view. First of all, such radiation is better perceived by the body, because we also radiate part of our heat in this range. Therefore, when using IR waves to maintain a comfortable temperature, the indicators on the thermometer are usually lower by 2-3 o C. And this leads to a decrease in heating costs. The second bonus is that you not only heat the room, but also heal. After all, infrared radiation ionizes the air, which helps to destroy many viruses and bacteria, and also destroys unpleasant odors. This type of rays is used to treat many diseases, and also helps to relax and relieve nervous tension. Another positive point: electromagnetic radiation is close to zero. The only drawback of this heating option is the high price of heating materials. But the installation is much easier and faster than cable systems and water floors.
When using infrared radiation for heating, it is not the air that heats up, but the objects located in the room. First of all, the floor becomes warm, which is felt as very warm, even if the temperature is low. And from heated objects, by convection, the air is heated.
Today, infrared floor heating can be done using two types of heaters: film roll material and a carbon rod mat. In both cases, carbon is used only in different states. Let's take a closer look at each of them.
Infrared film floor
IR film for floor - roll material. It is a carbon paste sealed in a polypropylene or polyester film. Conductive busbars (stripes) made of silver and copper run along the edges. These tires deliver an electric current to the carbon material (usually carbon). When an electric current passes through carbon, a large amount of heat is released. The strips are assembled in sections of several pieces in one. They can be cut along the dividing strip between the sections, which is convenient for installation. Such a structure is also good in that if one or more strips are damaged, the rest of the tape remains operational. Since the distance between the stripes is very small, even the failure of several elements in a row will not affect the sensations in any way: the floor will remain evenly warm. Roll width - from 50cm to 100cm, film thickness - from 0.2mm to 2mm.

Dignity
Film infrared flooring is compatible with most floor coverings. When laying hard surfaces - tiles, parquet and laminate flooring, no additional protective layers are required. Manufacturers recommend rolling out a plastic wrap on top, and then you can immediately put the tiles on a special glue for warm floors or a suitable laminate, parquet or floorboard. For wood products, infrared film floors are good because they create a uniform heat flux, which is why zones with different temperatures do not form in the wood, they crack and warp less.

There is one nuance here. Some manufacturers say that the film can be hidden in a screed or under tile adhesive, others do not recommend it. Most of the practitioners say that the film is destroyed in cement. Could it be the film itself? After all, it is also different, as well as different ways of connecting it.
For laying other soft surfaces such as linoleum, carpet, etc. a rigid base is required. For this, plywood, OSB or any similar sheet material is laid on top of the same plastic film. Once secured, roll out and secure the floor covering. That's all. Easier and several times faster than with a device cable underfloor heating.
disadvantages
The first is that the films are afraid of overheating. And although they have a significant margin of safety in temperature (melt at 200 ° C and higher, depending on the material of the insulating film), they can still burn out. Therefore, in those places where there is or will be furniture, large equipment, the film is not laid. Second disadvantage: high price. On average, one square meter of film will cost $ 25. The high price of IR films is partially offset by the absence of a screed and a long service life: if all recommendations are followed, it is more than 10 years. The third disadvantage is the need for painstaking and correct electrical connection of the film strips. The connection is made using terminal clamps and a set of electrical wiring, which are supplied with the film, but require correct use. It is also necessary to seal well with adhesive insulating strips those places of the contact rails that are not used. These are, in fact, all the disadvantages.

Installation and installation of an infrared floor from a film
The first good news is that when installing an IR film underfloor heating, no cement mortar or concrete is required. If your floor is even, then no "wet" work. The second good news is that in one room you can make such a floor with your own hands in one day. Even without special skills.
Payment
To correctly make a warm floor, you need to draw a floor plan to scale. Select the areas in which the furniture / appliances will stand. Next, you need. You need to supply power to it and connect the wires from the film heater and the temperature sensor to it. After that, in the area not occupied by furniture and appliances, it is necessary to arrange the strips of the film so that they do not overlap each other and do not intersect, but fill the entire area as much as possible.

How does one of the options for the "cake" of infrared floor heating using a carbon film look like?
The choice of heating intensity depends, firstly, on whether underfloor heating is the main type of heating or additional. If floor heating is only a matter of comfort, and the main heating of the room is carried out by other systems, you can choose from low-power models from 150 W / m 2. If the room is heated only from the floor, choose products with a power higher than 250 W / m 2 (currently 400 W / m 2 maximum).
The second factor that influences the choice of power is the type of flooring. Under the same operating conditions and the same requirements, a film of greater power must be laid under the tiles than under other types of flooring: it absorbs heat very intensively and at the same temperature it feels cold to the feet.
Installation of infrared film
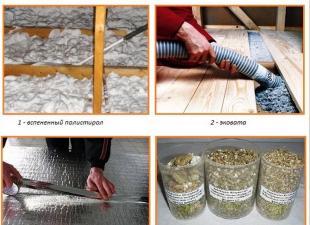
The first thing to do is to reduce heat loss through the floor and adjacent walls. To prevent leakage through the walls, a tape insulation or a strip of polystyrene foam 10 mm thick and about 10 cm high is laid around the perimeter. Then a layer of heat insulator is laid on a flat and clean subfloor (on the entire surface of the floor, and not just under the foam). In order for heating to be effective, it is advisable to use a foil or metallized material: it reflects downward heat. Since cement mortars are used very rarely here, the foil will also serve regularly for many years (it quickly collapses in the screed). The use of such material increases heating efficiency and reduces heating costs. The heat insulator can be rolled or in the form of mats and plates. Fasten the thermal insulation to the floor with glue, double-sided tape or staples from a mounting gun.

Then roll the infrared thermal foil downward in a copper strip on top of the plan (the top is matte, not shiny). Make sure that air does not collect underneath. Where necessary, cut the roll according to the markings (dotted line and scissors). It is more convenient if all the heating elements are turned with contacts to the wall where the thermostat will be installed. The distance between adjacent stripes is a few centimeters. If you plan an infrared floor under linoleum, it is better to lay the strips denser so that the distance between the tires is 1 cm. But the tires should not touch or overlap under any circumstances.
IR floor connection
Now you need to connect all the strips with an electric cable, which usually comes with the kit. Establish a contact on a live copper strip. One part of it is located under the dwelling, the other - on top. Now crimp the contact with pliers. So you install contacts on all tires, deployed towards the thermostat. On the far side of the thermostat, open sections of the copper conductor must be closed with insulating tape (included in the kit).

When installing a piece of insulation, cover the entire width of the bus, including the silver mesh, if any (see illustration). Having installed all the contacts and insulators, attach the IR film with tape to the heat insulator, and fasten the strips together with it.

A thermostat is installed on the wall. Lead wires to it from heating strips. Under one of them, you need to make a recess in the heat-insulating material for the floor temperature sensor and wires to it. After laying and securing the sensor, run the wires from it to the thermostat too.

The infrared floor connection diagram is shown in the figure. Now wires are connected to the contacts: they remove the insulation from a small area, the bare conductor (s) is inserted into the contact connector, squeezed with pliers. Check the strength of the connection and insulate with the piece of bitumen insulation that comes with the kit (two pieces, one on top, the other on the bottom, pressing them tightly against each other). Put all the wires on the thermostat, connect according to the diagram that is on its reverse side.

The electrical connection to the thermostat must be carried out by a qualified technician. After the power is on, you can test the system: set the temperature to 30 ° C, after a few minutes check whether the strips are heating well and whether the connections are sparking. If all is well, you can install a hard top floor covering or a base for soft materials.
Finish coating of IR floor
If tiles, parquet or laminate are laid on the infrared film floor, all that is needed is to roll out the protective (plastic or special) film. It will protect against water ingress on live parts during operation and will protect against damage during installation. If you are using laminate flooring, you can use a backing instead of film (or together with film). By the way, there is a special infrared film for tiles.
Under the tile, you need to lay a layer of glue 1-2 cm, and after it dries, start finishing work (special glue and grout for seams - for a warm floor). You can immediately put the tiles on the glue, but the thickness of the glue and tiles must be at least 2cm.

If a soft flooring is to be used, a hard base must be made for it. It can be sheets of plywood (10mm) or OSB, other similar material. It is attached to the floor with ordinary screws or dowels. Only when fixing a solid substrate should be careful not to get caught in conductive strips (copper and silver). It is also desirable to destroy as few carbon strips as possible. Having completed the manufacture of a rigid base, you can lay the floor covering - linoleum, carpet, carpet, etc. The main thing is that the temperature sensor and thermostat work, which will protect the film from overheating.
This is all the styling. You can turn on the infrared floor and warm up. By the way, the film does not have to be laid on the floor. You can make yourself an infrared wall or even a ceiling. There are even special IR films that are installed under suspended or stretch ceilings.
Mobile warm floor
One of the main advantages of the IR film is its elasticity and rather high strength. They decided to use these qualities to the fullest and made a mobile warm floor. It is a small piece of heating material with a thermostat and an electrical plug that can be carried from place to place. It can be bored and folded. You can put the rug anywhere and turn it on. The mobile heat-insulated floor can be made on the basis of infrared carbon film, or it can be based on a cable mat or resistive film. Naturally, IR mats are more expensive than resistive ones, but besides heating, they also have a healing effect.

Mobile infrared floor - mat with thermostat
If you have a piece left from the installation, you can make such a rug with your own hands by connecting a piece of IR film to the wires, carefully insulating the contacts. Then connect the wires to a standard plug. You will get a portable infrared heater. You can put this rug under your feet, on a chair, etc. Such a mobile film warm floor will help out if the heating suddenly fails, or it simply cannot cope with the abnormal cold. The connection time takes a few minutes. The only thing is that you need to ensure that there is no overheating. There is no thermostat in the home-made version, although you can connect it in conjunction with a sensor, but then the mat will be too expensive.
Rod infrared underfloor heating
This infrared floor is called rod floor because of the shape of the heating elements. Inside the insulating rod is a composite material that includes carbon, silver and graphite. This combination of materials added a very good bonus to the advantages of IR radiation: the system is self-regulating. That is, it itself can reduce / increase the amount of heat generated in each area.

The core infrared floor looks like this
IR rods are connected with insulated copper wires. The heating elements are connected in parallel, which means that if one or more elements are damaged, the rest of the system will work. But this applies to the rods. If you interrupt the connecting wire located on the side, the functionality will be lost.
Parallel connected carbon rods are rolled into rolls. Their width is 07-1.5 m, their length is up to 25 meters. Rated power 110-250W / rm. The heater operates at maximum power for several minutes until the screed heats up, then the amount of heat and power consumption are significantly reduced. Therefore, such floors are much more economical to operate than analogs of other designs.
Installation of IR floor from rods
This electric underfloor heating system is easy to install. The subfloor must be level. The maximum allowable height difference is 1cm per 1m 2. As with the foil heater, it is important to provide a good level of thermal insulation. Therefore, we lay thermal insulation along the walls and on the floor. As with other underfloor heating, the best option is a metalized material, which is attached to the base with double-sided tape, glue or staples.

Having laid the thermal insulation and glued its joints with tape, roll out the mat from above without reaching the opposite wall 15-20 cm. At the turning point, cut one of the side connecting cables in the middle between the rods and turn the roll in the desired direction. Repeat this operation until you finish styling. When unrolling the roll, make sure that the wires do not touch or cross. Use duct tape to attach the rods and conductors to the insulation and fasten them together. Until now, the process has been the same as when installing an infrared film floor. Then the differences begin.
Now, between the rods in the heat insulator, in some places, we cut out windows. They will "tie" the screed laid on the core IR floor to the subfloor. They are arranged in a checkerboard pattern. The total area of "holes" is 20-25% of the area of thermal insulation. It is better to cut a lot of small pieces - this way there will be less heat loss through them. Now it's the turn of the electrical part.
Connecting rods
Using the wire and terminals included in the kit, you need to connect the cut supply wires to one system. We remove the insulation from the wire by about 1 cm in the place where it was cut when turning the mat. We take the clamp / contact and put it on the bare conductor, crimp it with pliers or pliers. On the wire from the kit we put on a piece of heat-shrinkable tube of a slightly larger diameter. We insert the stripped end of this wire on the other side into the contact. We squeeze it too. Having checked the strength of the connection (pull it) with the help of a construction hair dryer, we achieve shrinkage of the tube on the contact. We got a well-insulated contact. Some companies use bitumen instead of heat-shrinkable pipes for insulation. The strips of this material adhere very well to any surface and do not conduct current. In this case, take a piece of bituminous insulation and, having laid the contact, squeeze it well. So we connect all the contacts. The connection diagram is shown in the figure.

Having collected everything, we connect it to the thermostat installed on the wall. We also connect a temperature sensor to it, which we place in the middle between the rods (you can fix it with tape). After completing the connection, turn on the system, set it to 30 ° C and carefully observe. If there is no sparking, there is no strange smell, all the strips are heating up, then everything was done correctly and you can proceed to the final stage of installation.
Laying the floor covering on an IR rod floor
This option is an ideal choice for underfloor heating under tiles. In this case, the installation is very simple. Just take tile adhesive and tiles and lay them down. The only condition is that the thickness of the glue + tile must be more than 2cm for uniform heating and a normal level of heat transfer. This is the best warm floor for tiles or porcelain stoneware.

All other types of coverings require a screed. Its thickness is at least 2cm. Laying the flooring only after the composition has completely dried. Moreover, keep in mind that it is categorically impossible to turn on the underfloor heating system to accelerate drying: cracks will appear, and they lead to a decrease in heating efficiency.
Infrared radiation is not the only way to provide electric underfloor heating. Can be stacked or made
Outcomes
The installation of infrared underfloor heating is several times easier than similar cable systems. Their undoubted plus is useful and pleasant radiation, high heating rate and lower energy consumption (carbon infrared floors are especially beneficial from this point of view). Disadvantage: high price and rather troublesome and painstaking electrical assembly.